Showing posts with label jam. Show all posts

October 21, 2023

Maritozzi


I could literally kick myself for never having tasted Maritozzi, a traditional Italian breakfast treat consisting of a brioche bun filled with freshly whipped cream, whenever I visited Italy.  This enticing Instagram post from Bread by Elise motivated me to correct that grievous error. 
 

What especially drew me to Elise's bun recipe was the use of tangzhong.  This flour and milk roux added into the dough ensures that the bread maintains a soft interior long after baking.   As I was making the dough I could tell straightaway that the buns were going to be fantastic because the dough's texture was so elastic, light and easy to work with.    

Who doesn't love freshly whipped cream and maritozzis are filled to the brim with it, along with a layer of homemade tart raspberry jam.  A marriage made in breakfast heaven.  The only drawback, if you consider it one, is that the maritozzi tastes best when consumed à la minute, i.e., right away.    Next time I think I'll freeze some of the unfilled, baked buns and then reheat and fill them at a later time.  Now that I'm confident in my maritozzi-making skills I can save myself the price of a plane ticket to Italy, although I'd happily still go for pasta and shopping!


June 2, 2022

Mini Victoria Sandwich Cakes


Even though I'm not from England I have to admit I'm a fan of the British royal family.  (Especially the Duke and Duchess of Sussex who are favorites of mine!)  I just love the history, traditions and pomp and circumstance that goes hand in hand with the institution.  In honor of Queen Elizabeth's Platinum Jubilee celebrations this weekend I made Mini Victoria Sandwich Cakes, named after the second longest reigning monarch, Queen Victoria.  She was known to enjoy a slice of cake along with her afternoon tea.
 
 
If you've been to England I'm sure you've seen this tempting cake at a tea salon or bakery. It's  comprised of two vanilla cake layers that are "sandwiched" with berry jam and buttercream or whipped heavy cream.   What makes it so appealing to me is its simplicity; there's no need to cover the entire cake with frosting or other embellishments.  In fact, you could say it was the original naked cake.   
 
 
Recipes abound on the internet and you'll have no trouble finding one, e.g., Mary Berry's.  Most call for self-raising flour, widely used in British baking, but I've found that cakes made with self-raising flour can be hit or miss because the type sold in the US isn't exactly the same as those sold in the UK.  Plus, I like being able to control the amount of leavening in a recipe.   
 
Luckily I found Nigella Lawson's Victoria sponge recipe, which used all-purpose flour (aka "plain flour"), cornstarch and baking powder.  Cornstarch was a new ingredient I hadn't seen before and was supposed to make the cake tender and light.  The process to make the batter couldn't be simpler either.  Just throw everything into a food processor and whiz it up for a few minutes until creamy.  
 

To mini-size the cake I used a nonstick cheesecake pan with removable bottoms, which made releasing the cakes super easy.  They did bake up with a bit of a hump on top, but I leveled them off with a serrated knife after they were cooled.  Baker's treat!  The cake gets a 5-star rating from me with it's tender, light crumb and delicious taste.  
 
I sandwiched the mini cakes with some leftover Swiss meringue buttercream that I had thawed from the freezer and homemade raspberry jam.  The smaller cake was the perfect portion and would satisfy anyone's sweet tooth.  All that remained was a light dusting of powdered sugar and a nice cuppa. 

Many congratulations to the Queen for her selfless years of service.  God Save The Queen!

July 22, 2021

Fried Peach Hand Pies


My obsession with McDonald's fried apple pies is well known amongst family and friends.  You can be fairly certain that if I come across a franchise that has the fried pies on the menu I will definitely be buying them.  Unfortunately it's the baked variety that is commonly sold in the States so I have to get my fried pie fix when I'm out of the country (normally you can find them in Europe). 


I've got peaches on the brain lately because we're at the height of the season.  As I was looking up peach recipes on Cook's Illustrated I came across this recipe for Fried Peach Hand Pies.  What?  A fried pie made with peach filling?  Sold!


What I particularly love about this recipe is that you can use either fresh or frozen peaches, especially handy when it's not peak peach season.  The crust couldn't be simpler to make in the food processor and is easy to work with.  I tested the recipe using frozen peaches and, call me crazy, I actually think the peach flavor is more pronounced using frozen fruit.  Who would have known?  
 

The deep fat fryer I bought at the beginning of the pandemic made quick work of frying the pies in no time at all. Is there anything better than the sound of food frying?  Impatient to see how they tasted I had to have a taste of a fried pie while it was still hot.  One bite and I was not disappointed.  So delicious!  The golden brown crust was nice and flaky and the filling was bursting with peach flavor.  I gave some pies to my sister to taste and she said they were fantastic.   Now I want to try other fruit fillings to use with the dough.   Dare I attempt to replicate my beloved McDonald's fried apple pie?  We shall see....

February 21, 2021

Buttermilk Biscuit Jammers

Every now and then I'll see a bake posted on Instagram and think to myself, "Now why didn't I think of that?"  This exact thing happened recently when I saw SF Cooking School post a picture on their Instagram stories of their take on Grand Central Bakery's famous buttermilk biscuits filled with jam.   These Buttermilk Biscuit Jammers are a genius combination of flaky, buttery biscuit filled and sweet, fruity jam.  I had to make some for myself.   
 
 
If you search google you can find Grand Central's recipe for their jammers pretty easily, like this one, but since I still had plenty of White Lily self-raising flour leftover from a past trip to Charleston I made my version of the buttermilk biscuit jammers with that instead.  The recipe was one I found on White Lily's Instagram account and only requires four ingredients: self-rising flour, butter, buttermilk and jam.     


The key to getting super flaky biscuits is to make sure all of your ingredients are COLD!  It also doesn't hurt that this particular recipe has a lamination technique that produces multiple layers.  Once I combined the flour and grated butter in a bowl I left it in the freezer overnight to ensure it was at the ideal temperature.  The next day I mixed in the cold buttermilk and shaped, folded, cut and filled the dough.  Use your favorite jam to fill the biscuits.  I used some store bought as well as homemade jams so I had a nice variety. 


As I write this post I literally just polished off my third biscuit.  They are THAT good and everything you'd want in a buttermilk biscuit.  Next time I make them I'll adjust for the following: cut the biscuits with slightly smaller cutter (using a 2" round cutter) and make the jam indentation a bit wider (so you get more jam!).  
 

February 8, 2021

Valentine's Day Yeasted Doughnuts


Last month's baking hiatus motivated me to get back into the kitchen even more than before.  Here's another Valentine's Day themed treat for you that will surely win the hearts and stomachs of your loved ones.  These Yeasted Doughnuts from Cook's Illustrated are hands down the BEST ever.   

When I first saw the recipe published in the May/June 2020 issue of their magazine I ordered a deep fat fryer straight away specifically to make the doughnuts.  Chalk it up to the corona crazies because I normally tend to avoid frying at home at all costs, but let me tell you, these doughnuts are more than worth it.


How cute are the heart shapes for Valentine's Day?  I rolled some of the doughnuts in a raspberry sugar (sugar + crushed, freeze dried raspberries) and filled them with my homemade raspberry jam. Others I dipped in a chocolate glaze and decorated with sprinkles.   I recommend trying to cut out as many doughnuts as you can from the first roll of the dough.  I've found that re-kneading the remaining scraps and re-cutting yields tougher doughnuts.  

Happy Valentine's Day!


Yeasted Doughnuts

Doughnuts
4 1/2 cups (22 1/2 oz) all-purpose flour
1/2 cup (3 1/2 oz) granulated sugar
1 teaspoon instant or rapid-rise yeast
1 1/2 cups whole milk
1 large egg
1 1/2 teaspoons table salt
8 tablespoons (4 oz) unsalted butter, room temperature, cut into 1/2-inch pieces
2 quarts vegetable oil, for frying

Chocolate Frosting
4 oz bittersweet chocolate, chopped
1/2 cup water
2 cups (8 oz) powdered sugar
2 tablespoons unsweetened cocoa powder
pinch of table salt 

For Jam-Filled Doughnuts
1 cup sugar
1/4 cup freeze dried raspberries, crushed
1 1/2 cup raspberry jam

FOR THE DOUGHNUTS: Stir flour, sugar, and yeast together in bowl of stand mixer. Add milk and egg and mix with rubber spatula until all ingredients are moistened. Fit stand mixer with dough hook and mix on medium-low speed until cohesive mass forms, about 2 minutes, scraping down bowl if necessary. Cover bowl with plastic wrap and let stand for 20 minutes.

Add salt and mix on medium-low speed until dough is smooth and elastic and clears sides of bowl, 5 to 7 minutes. With mixer running, add butter, a few pieces at a time, and continue to mix until butter is fully incorporated and dough is smooth and elastic and clears sides of bowl, 7 to 13 minutes longer, scraping down bowl halfway through mixing. Transfer dough to lightly greased large bowl, flip dough, and form into ball. Cover bowl with plastic. Let sit at room temperature for 1 hour. Transfer to refrigerator and chill overnight (or up to 48 hours).
 
Adjust oven racks to lowest and middle positions. Place loaf pan on lower rack. Line rimmed baking sheet with parchment paper and grease parchment. Transfer dough to lightly floured counter. Press into 8-inch square of even thickness, expelling as much air as possible. Roll dough into 10 by 13-inch rectangle, about ½ inch thick. Using 3-inch round cutter dipped in flour, cut 12 rounds. Using 1-inch round cutter dipped in flour, cut hole out of center of each round. Transfer doughnuts and holes to prepared sheet. (If desired, use 1-inch cutter to cut small rounds from remaining dough. Transfer to sheet with doughnuts.) Bring kettle or small saucepan of water to boil.
 
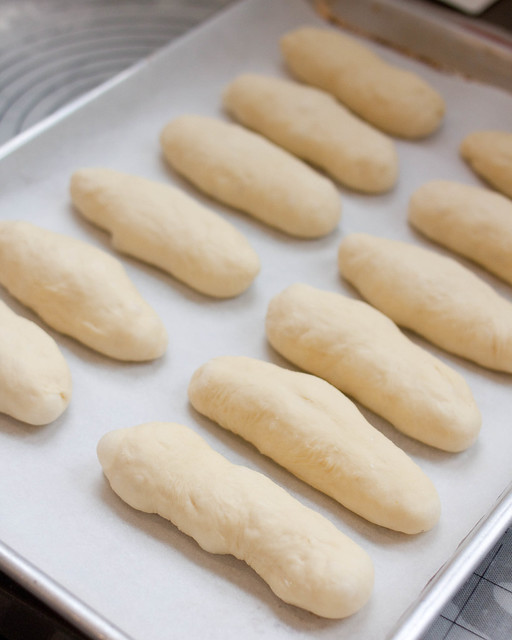
Pour 1 cup boiling water into loaf pan. Place sheet on upper rack, uncovered. Close oven and allow doughnuts to rise until dough increases in height by 50 percent and springs back very slowly when pressed with your knuckle, 45 minutes to 1 hour.
 
About 20 minutes before end of rising time, add oil to large Dutch oven until it measures about 1½ inches deep and heat over medium-low heat to 360 degrees. Set wire rack in second rimmed baking sheet and line with triple layer of paper towels. Using both your hands, gently place 4 risen doughnuts in oil. Cook until golden brown on undersides, 1 to 1½ minutes, adjusting burner as necessary to maintain oil temperature between 350 and 365 degrees. Using spider skimmer, flip doughnuts and cook until second sides are browned, 1 to 1½ minutes. Transfer doughnuts to prepared rack. Return oil to 360 degrees and repeat with remaining doughnuts. For doughnut holes, transfer all to oil and stir gently and constantly until golden brown, about 2 minutes. Transfer to prepared rack to cool. Let doughnuts cool completely, about 20 minutes.
 
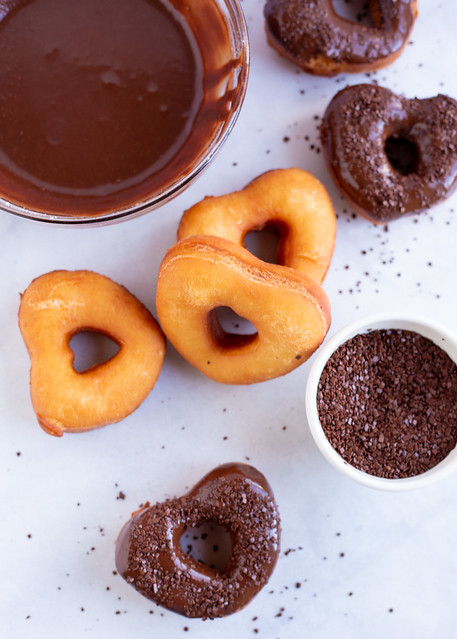
FOR THE CHOCOLATE FROSTING: While doughnuts cool, microwave chocolate and water in medium bowl at 50 percent power until chocolate is melted, about 30 seconds. Whisk in sugar, cocoa, and salt until smooth and fluid. Let cool slightly.
 
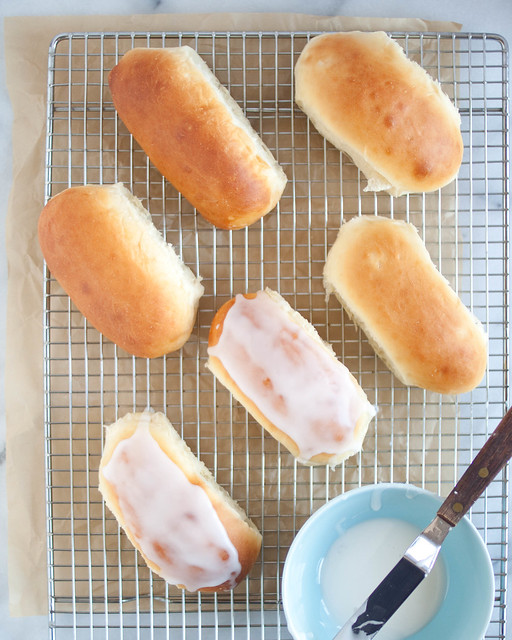
Set clean wire rack in now-empty sheet. Dip top half of 1 cooled doughnut into frosting until evenly coated, allowing excess to drip back into bowl. Invert doughnut and place on wire rack. Repeat with remaining doughnuts. Let doughnuts stand until frosting is dry to touch, 15 to 30 minutes, before serving.
 
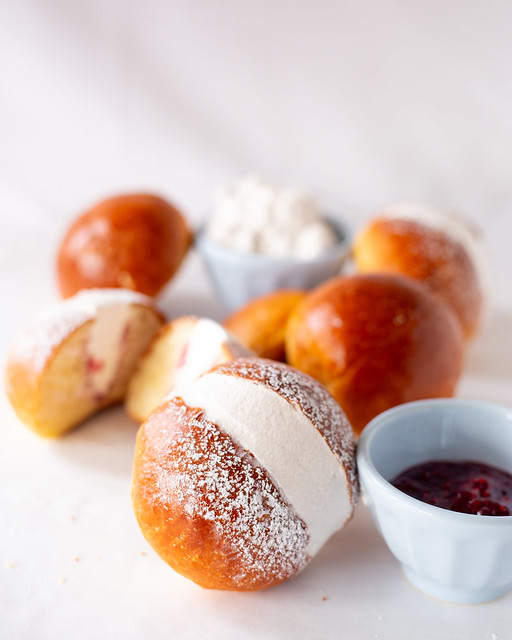
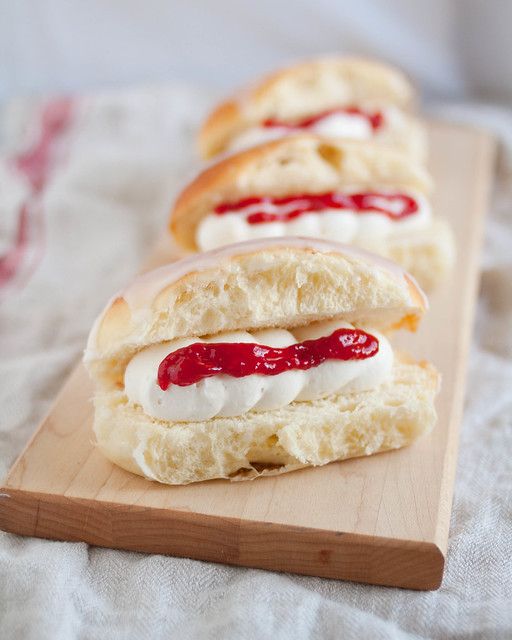
FOR THE RASPBERRY JAM FILLED: Mix sugar and freeze dried raspberries in small bowl. Spoon jam into pastry bag or zipper-lock bag fitted with ¼-inch round pastry tip.
 
Working with 1 doughnut at a time, coat all sides of doughnut in sugar and return to rack. Insert paring knife through side of 1 doughnut until tip almost reaches opposite edge. Swing knife through doughnut, creating large pocket. Repeat with remaining doughnuts. Stand doughnuts slit side up in 13 by 9-inch baking pan.
 
To fill doughnuts, insert pastry tip ¾ inch into opening and squeeze gently until jam just starts to appear around opening, about 2 tablespoons jam per doughnut. Let doughnuts stand in pan for 10 minutes to allow jam to settle. Serve.
 

February 6, 2021

Raspberry Jam Shortbread Hearts


January came and went in a flash without much baking on my part.  To be honest I was a bit burnt out from all the holiday baking I'd done and on top of that work was keeping me busy, but now I'm back and raring to go.   First up are these super tasty and cute Raspberry Jam Shortbread Hearts which are perfect for Valentine's Day.  The crispy, buttery shortbreads are filled with my homemade, tart raspberry jam and are utterly delicious.  They actually remind me of the British "Jammie Dodgers" biscuit.  

I used a heart shaped thumbprint cookie stamp I bought from Williams-Sonoma a few years ago.  The set also comes with a rectangle and circle shape and cuts and shapes the cookie dough perfectly.  You get professional looking results with little to no effort!

For the shortbread dough I tweaked my favorite clotted cream shortbread recipe.  Since I didn't have any fresh clotted cream I just replaced that amount in the recipe with the same amount of butter.  The dough is super forgiving and you can't really mess it up.  My main tip is to roll the dough to at least 1/4-inch thickness; any thinner and it will be harder to get the nice embossed design on the cookie. 

Gift these cookies to your loved ones for the tastiest Valentine. 

 Happy Valentine's Day!

April 25, 2020

Yeasted Doughnuts


Deep fat frying at home is one of those things I've tended to shy away from.  Mainly because I hate the cleanup and then what to do with all that used oil afterwards?  However, one glance at the Yeasted Doughnuts recipe in the May/June 2020 issue of Cook's Illustrated magazine and all those concerns went out the window.  They looked A-M-A-Z-I-N-G!  Chalk it up to the COVID crazies but I even bought an electric deep fat fryer just so that I could make the doughnuts.


I don't have a huge sweet tooth (I normally prefer salty things) but I would never turn down a good doughnut.  My favorite kinds are powdered sugar, regular glazed or chocolate frosted (sometimes with sprinkles).  With the aid of my trusty stand mixer the dough came together quite easily.   The enriched dough rests in the fridge for up to 48 hours so this is a great make-ahead recipe.


Each recipe makes a dozen doughnuts and some little holes as well and I made two batches. For my doughnut flavors I went with classic glazed, chocolate frosted, coffee frosted and filled.  For some of the filled doughnuts I used homemade raspberry jam that I had made a few weeks ago.  Considering that I also love pineapple I couldn't let the opportunity pass me by to fill the rest with the most delicious pineapple filling.  Surprisingly though, out of all the flavors I think my favorite was the coffee frosted.  I'm not a huge coffee drinker but I loved how the bitterness of the espresso powder was a nice balance to the sweet frosting.


One bite of the glazed doughnut and I was in heaven!  It was so light and fluffy, exactly like what you would find in your local shop.   I ended up giving away the rest of the doughnuts to my friends because I was too afraid to keep them in the house, lest I eat more! 

April 2, 2019

Swedish Princess Cake (Prinsesstårta)


I'd been looking for a cake to celebrate spring and Easter and the first thing that popped in to my head was a Swedish Princess Cake (or Prinsesstårta).  It's been on my baking bucket list for what seems like an eternity so it was finally time to have a go.  Fittingly, I think my introduction to these beautiful cakes was at IKEA many, many years ago...ha!  What could be more delicious than moist vanilla genoise sponge cake filled with layers of raspberry jam, diplomat cream a gorgeous dome of whipped cream and then covered in verdant colored marzipan?   Nothing, I tell you!


For the recipe I turned to Mary Berry, of The Great British Bake Off fame.  Princess cake was the technical challenge in the Continental Cakes episode of Series 5.  At first glance this recipe is daunting, there's a lot of ingredients and a lot of steps!, but don't be deterred. While the contestants were given just over two hours to complete their cakes I made my life easy and decided to make it over the course of a weekend.  Some of the components (pastry cream, jam, marzipan and fondant rose) were made on the first day and the sponge cake and assembly were done on the second day.   


I passed on the chocolate decorations from Mary's original recipe and kept it sweet and simple with a light dusting of powdered sugar.  I just think it looks so stunning in an elegant and understated way. I don't know about you, but I seriously love all the spring feels this cake is giving me.  The beautiful pastel green marzipan exterior and cream and pink interiors are just so refreshing and light.  No doubt this beauty will banish any wintertime blues you may have.  

Happy Spring!

February 17, 2019

Iced Fingers


I'm a huge fan of The Great British Bake Off and this recipe for Iced Fingers was featured in one of the earlier seasons of the show.  I'd been meaning to make them ever since I first watched that episode all those years ago so you could say these are long overdue.  There's just something so inviting about a soft and fluffy bun filled to the brim with whipped cream and jam. 


The recipe comes from Paul Hollywood, GBBO "male judge" and bread baker extraordinaire, so you can pretty much assume it's going to be a winner.  And you would not be wrong.  Enriched dough is not as difficult to make as you might think and this one has the most beautiful texture to work with.  You could make the dough by hand, as suggested in the recipe, but I'm too lazy for that and leveraged my trusty Kitchen Aid stand mixer.  It makes your life so much easier!


Baked to a lovely golden brown the fingers had a beautifully soft and fluffy interior.  My main deviation from Paul's recipe was in the filling.  Rather than using whipped heavy cream on its own I added softened cream cheese to give it more structure and stability.  The last thing you want is a weepy iced finger!  Once iced and filled with cream cheese whipped cream and raspberry jam these fingers were a dream to eat.   


One caveat though: I highly recommend making the buns all in the same day to get the maximum freshness and flavor.  I spread it out over two days and found that the buns weren't as soft and fluffy as they were when they were freshly baked...still tasted great though!

June 3, 2018

White Lily Buttermilk Biscuits with Strawberry Rerigerator Jam


Last month I found myself in Florida with the primary purpose of going to Universal Orlando.  I'm a Harry Potter fan and had been wanting to check out the two HP themed attractions there.  I was especially excited about Harry Potter and the Escape from Gringotts ride since the California location didn't have it.  You would think that as an enthusiast I would have brought back a wand or similar as a memento, right?  Wrong!

What was my Floridian souvenir you may ask?  Flour!  Yes, way, flour.  More specifically, White Lily flour.  [Don't be too surprised though, I am a baker after all.]  I'd heard a lot about how amazing White Lily flour was, especially for biscuits, but unfortunately it's accessibility was mainly limited to the South.  [Yes, I know you can find it online, but I'm too cheap to pay shipping fees for flour!]   


During some down time in Orlando I made a beeline to the closest supermarket I could find which happened to be Publix.  Call me strange, but checking out local grocery stores is one of my favorite things to do whenever I travel.  The store was your typical market, but as I was strolling the baking aisle I suddenly remembered about the White Lily flour.  I can't tell you excited I was to see it on the shelf!  I promptly bought four 5 lb bags to bring back to San Francisco with me.  Three of the bags were self-rising flour and the remaining one was all-purpose.  Luckily I managed to fit this haul in to my carry on suitcase.


I finally got around to making the buttermilk biscuits today and I have to say I am blown away by how light, fluffy and utterly delicious they are.  All the hype around White Lily flour is most well deserved in my opinion.  Who would have thought that just three ingredients (self-rising flour, shortening and buttermilk) could create something so delicious?  I give it the highest compliment I know by saying they are just as good, or even better, than KFC's buttermilk biscuits, which until now were my benchmark.


To accompany the biscuits I made a quick strawberry refrigerator jam using a recipe from Cook's Illustrated and local organic strawberries I bought at the farmer's market.  The jam is super easy to make and tastes fantastic with the buttermilk biscuits.  Pure heaven I tell you!


December 20, 2017

Italian Tri-Color Cookies


I'll be honest with you, I definitely had a lot of hesitation when making these Italian Tri-Color Cookies, also called Rainbow Cookies or 7-Layer Cookies.  Why, you may ask?  Because the first time I attempted them it was a horrible failure.  My Achilles heel was the chocolate coating on the top and bottom.  When I tried cutting the cookies in to bite sized pieces the chocolate completely fell apart and separated from the almond layers.  The perfectionist in me was devastated, to say the least.

But recently I was asked by my friend Maria if I knew how to make them.  Maria grew up on the East Coast (New York City to be exact) and apparently these cookies are ubiquitous staples in every Italian bakery there.  Unfortunately they're not so easily found out here on the West Coast.  Every now and then Maria has a craving for these cookies so I thought I would give it another go and try to give her a taste of home.


Never one to be defeated I set about looking for a "foolproof" recipe - or at least something close to it.  I stumbled upon Smitten Kitchen's recipe and had a very strong feeling they would turn out great.  I'd had previous success with her tres leches cake, one of my absolute favorites.  Just reading through Deb's helpful tips gave me the reassurance I needed.  Be forewarned though: these cookies aren't hard to make but they require some time, most of it inactive though.  

If you like almond flavor these tri-colors are for you!  The festive colors and almond flavor make them the perfect holiday cookie to add to your repertoire.  The true test though would be Maria's review.  I gave her a sample and she said they tasted pretty authentic to her.  Her hubby Lou said the chocolate needed to be thicker..hahaha...I'll remember that for next time! 

July 30, 2016

British-Style Scones


Since returning from London a week ago I've made this scone recipe no less than four times.  Yes, it's that good.   But who am I kidding?  While I do love how they taste they're really more of a vehicle for clotted cream and jam.  Yes, I am one of those crazy people who brings back 8 tubs of Rodda's in my checked luggage.   Thank goodness I wasn't stopped by customs!


Unlike the American version, British-style scones are less sweet and more fluffy and biscuit-like.  My favorite dessert after dinner when I was in the UK was having a scone smothered with a heap of clotted cream and jam.  Absolute heaven I tell you. 


This recipe from Cook's Illustrated is as authentic as any scone you'd find in an English tea salon.  They're quite simple to make and the taste will transport you to ol' Blighty, I promise.  Fresh clotted cream may be challenging to find in the States, which is why I bring a supply back with me, but these scones are just as delicious with butter and jam.  Give them a try, you won't regret it!


Related Posts Plugin for WordPress, Blogger...